Filter Installation – Android Lite

Android Lite

New Device Setup

Filter Installation – Android Lite

Step-by-step video walk-through of Android Lite installation: https://gentechsolution.com/wp-content/uploads/2016/08/lite1.mp4

  1. Download and install Livigent Lite onto the device https://support.gentechsolution.com/attachments/download/462/Livigent.Lite.343.Release.Data.Fix.apk.
  2. If necessary, go to Settings > Security > Unknown Sources and Allow.
  3. Open app and enter 8995 or TAG as provider code. For UK use 8991 or TAGUK.
  4. Press Next and follow prompts as shown.
  5. When prompted to create device password, enter a 4-digit PIN for the screen unlock password.
  6. You’ll need to turn on Livigent Lite for Apps usage access, Accessibility, and Draw over apps permissions. Some devices don’t need Apps usage or Draw over apps permissions.
  7. Note: When restarting the phone you may need to wait 1-2 minutes until the phone will accept the PIN.
  8. Enter the Filtering Username and Password from the User’s account in the CRM > Settings tab.
  9. Tap Check Credentials then Set Credentials.
  10. Go to the CRM account and adjust the apps and settings as appropriate. See below.
  11. In the Livigent Lite app, open the menu and tap Update policy.

Proceed to App Management


App Management

  1. Click the Reload link to load the devices apps into the CRM. (see screenshot below)
  2. Adjust the apps as appropriate. See CRM Setup D. Apps Tab (Android only).
  3. For Playstore, see Playstore section below.
  4. Click the green Save and Config User button at the bottom.
  5. Press Update Policy inside the Filter app

Playstore

1. Allowing Playstore

  1. Click on the Apps tab.
  2. If necessary, click the Reload link to retrieve apps list from device.
  3. Find com.android.vending in the apps list.
  4. Select Allow Installed, deselect the other options.
  5. In the Filtering tab, switch the App Store to Allow.
  6. Open the Settings tab > Please Use Categories section, verify that TAG Block Playstore is not selected.
  7. Verify that play.google.com is not listed in any blacklists.
Note: This will become simplified as the system develops.

2. Blocking Playstore

  1. In the Filtering tab, switch the App Store to Block.
  2. In the Settings tab > Please Use Categories – uncheck TAG Allow App Store.

Removing the screen-lock PIN.

  1. Open the Livigent Lite menu.
  2. Tap Lock Screen.
  3. Enter the current screen lock PIN.
  4. Tap the Activate Swipe button.

The screen is now set to swipe.

Uninstalling

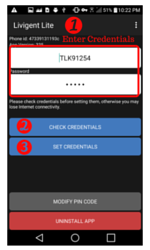
1. Uninstalling with Deactivation Code

  1. Locate the user’s account in the CRM.
  2. Click on the blue Request Uninstall Code button (in the Settings tab, underneath the Username field).
  3. A deactivation code will appear.
  4. If you see an error, try pressing Set Credentials inside the Livigent app and try again.
  5. In the Livigent App, press the Red Uninstall button.
  6. Enter the code into the Deactivation code field.

2. Uninstalling with Remote Permission

Alternatively, you can uninstall by giving remote permission.
  1. Locate the user’s account in the CRM.
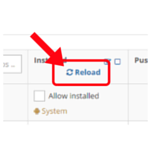
  2. Click on the Last Seen link (Right underneath the username field).
  3. Verify that the device ID listed there is the same as the phone ID in the Livigent Lite app.
  4. Click the red Manage Uninstall Rules button.
  5. Copy the device ID and paste it in the New Device ID field.
  6. Click the green Add Device ID button to the right.
  7. Scroll to the bottom of the page and click the green Save & Config User button.
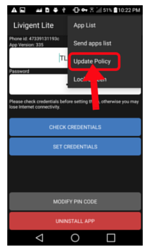
  8. Perform a Update Policy from inside the Livigent Lite app.
  9. Press the Uninstall Button at the bottom of the Livigent Lite app.